Staff
Under Admin → Staff you manage all employees, their roles, permissions and access credentials. Each employee can receive individual rights — from a simple waiter to an administrator with full access.
💡 In Normal mode (toggle top right) you only see the General tab with the master data. The Personal tab (date of birth/address, start/leave date) and Rights tab appear only in Expert mode. The active status is shown as an icon badge (✓ Active / ✕ Inactive).
Staff Overview
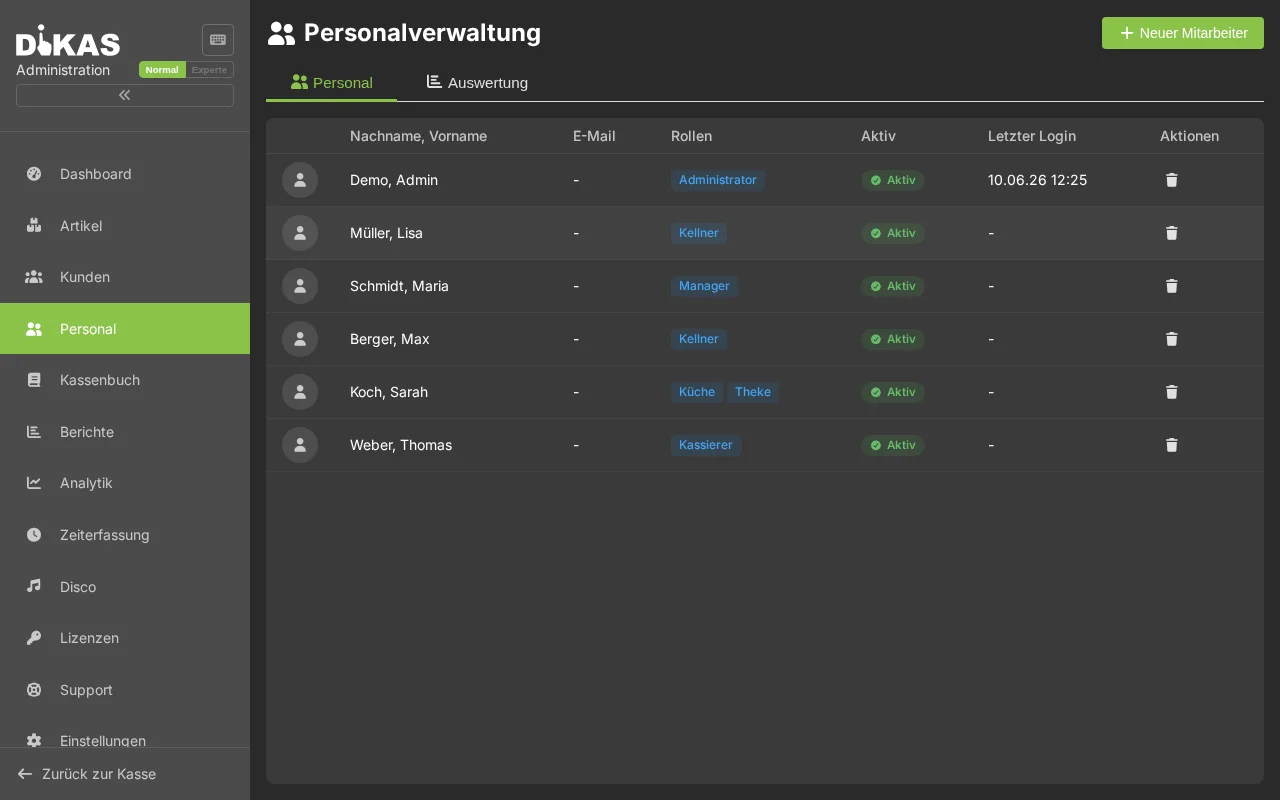
The list shows all employees with:
| Column | Description |
|---|---|
| Name | First and last name |
| Short Name | Display name at the POS |
| Staff Number | Unique number |
| Role | Waiter, shift manager, admin |
| Status | Active / Inactive |
| Last Login | Date and time |
Creating an Employee
- Click "+ New Employee"
- Fill in:
Tab: General
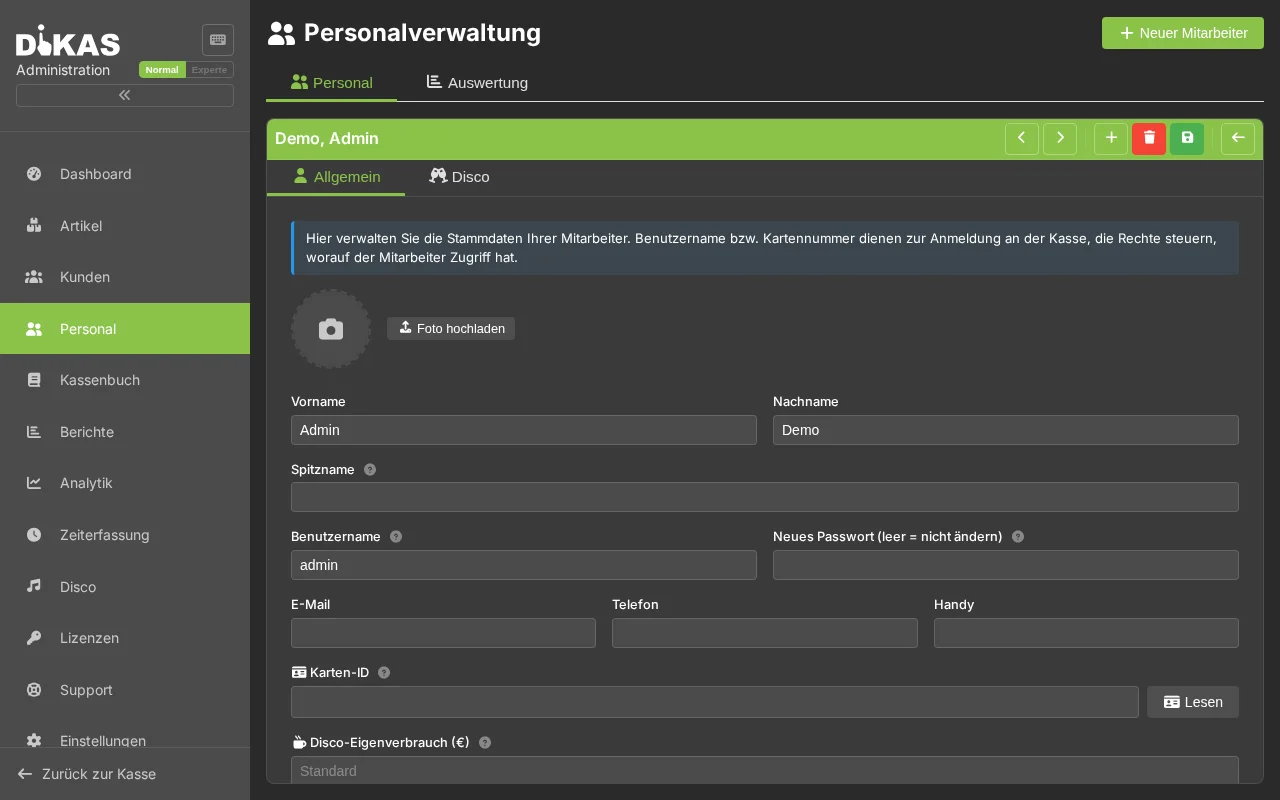
| Field | Description | Required? |
|---|---|---|
| First Name | First name | Yes |
| Last Name | Last name | Yes |
| Short Name | Display name at the POS (e.g. "Maria") | Yes |
| Staff Number | Unique number | Automatic |
| PIN | 4-digit, for staff switch | Yes |
| Password | For login screen and admin access | No |
| Email address | No | |
| NFC Card ID | For contactless login | No |
| Is Active | Employee can log in | Yes |
Contact & Address
| Field | Description |
|---|---|
| Phone | Landline number |
| Mobile | Mobile number |
| Street | Street + house number |
| Postal Code / City | Postal code and city |
Personal Data
| Field | Description |
|---|---|
| Gender | Male / Female / Diverse |
| Date of Birth | Date of birth |
| Place of Birth | Place of birth |
| Employment Start | Start date |
| Employment End | End date (when leaving) |
| Photo | Profile picture |
Tab: Permissions (CashPointRights)

Each employee can receive individually configured POS rights:
Access Control
| Permission | Description | Default (Waiter) |
|---|---|---|
| Deny Login | Employee cannot log in | No |
| Check Out | May process payments | Yes |
| Close Shift | May end a shift | No |
| End-of-Day Report | May create a Z-report | No |
| Transfer Table | May assign tables to other waiters | Yes |
| Open Invoices | May create/view invoices | No |
| Record Expenses | May book expenses/cash withdrawals | No |
| Open Cash Drawer | May manually open the drawer | Yes |
Void Permission
| Permission | Description |
|---|---|
| StornoLevel | Void permission (0 = none, 1 = own receipts, 2 = all receipts) |
| Grant Discount | May grant discounts |
| Manual Price | May override article prices |
StornoLevel in Detail:
| Level | Description |
|---|---|
| 0 | No void allowed |
| 1 | May only void own receipts |
| 2 | May void all receipts (including those from other waiters) |
Table Restrictions
| Permission | Description |
|---|---|
| Own Tables Only | Only sees own tables in the POS view |
| Pay All Tables | Can also check out other waiters' tables |
Display & Reports
| Permission | Description |
|---|---|
| Hide Revenue | Waiter cannot see revenue figures |
| Hide Disco Statistics | No disco statistics visible |
| Show All Receipts | See all receipts on the tablet (not just own) |
| Admin Payment Methods | May manage payment methods |
| Inventory Management | May manage stock levels |
Role Templates
Typical permission profiles:
| Role | Check Out | Void | Discount | End-of-Day | Expenses | Admin |
|---|---|---|---|---|---|---|
| Waiter | ✓ | Own (1) | — | — | — | — |
| Head Waiter | ✓ | All (2) | ✓ | — | — | — |
| Shift Manager | ✓ | All (2) | ✓ | ✓ | ✓ | — |
| Administrator | ✓ | All (2) | ✓ | ✓ | ✓ | ✓ |
The roles are recommendations — you can customize the permissions individually for each employee.
Tab: Working Hours
If time tracking is enabled (Admin → Settings → Operations → Time Tracking):
| Display | Description |
|---|---|
| Clock Times | Clock in, break, return, clock out — by day |
| Monthly Overview | Working days, total hours, break hours |
| Hours Total | Monthly working time |
| Edit Clock Entry | Correct time/type, add missing entries |
Detailed instructions: → Time Tracking
NFC Card Login
The fastest login method — hold the card to the reader, done:
- Obtain an NFC card (standard RFID/NFC card)
- Determine card ID: Scan the card at the reader → ID is displayed
- Admin → Staff → [Employee] → NFC Card ID — enter the ID
- From now on: Hold the card to the reader → employee is logged in
Card lost? Delete the old card ID in admin and assign a new card. The old card will no longer work.
Deactivating an Employee
When an employee no longer works:
- Open the employee
- Deactivate "Is Active"
- Optional: Enter Employment End (end date)
- Save
The employee can no longer log in but remains in historical data (receipts, reports, time tracking). Employees should never be deleted — only deactivated.
Login Security
| Feature | Description |
|---|---|
| Failed Attempts | Number of failed login attempts is counted |
| Automatic Lock | After too many failed attempts, the account is locked |
| Locked Until | Time until the lock expires |
| Last Login | Time of the last successful login |
Practical Example: Restaurant with 5 Employees
| Employee | Role | PIN | NFC | Permissions |
|---|---|---|---|---|
| Maria Schmidt | Shift Manager | 1234 | ✓ | Everything except Admin |
| Thomas Weber | Head Waiter | 5678 | ✓ | Check out, All voids, Discount |
| Lisa Müller | Waitress | 9012 | — | Check out, Own voids |
| Max Berger | Part-time | 3456 | — | Check out only, Own tables only |
| Chef | Admin | — | — | Full access (password login) |
Frequently Asked Questions
Can an employee have multiple roles? Yes. Permissions are set individually per employee — you can configure any combination.
What happens if an employee forgets their PIN? An administrator can reset the PIN in the admin area.
Can employees see their own permissions? No. Permissions are only visible in the admin area.
How many employees can I create? Unlimited. Inactive employees do not burden the system.
Next Step
→ Table Plan — Manage tables and groups