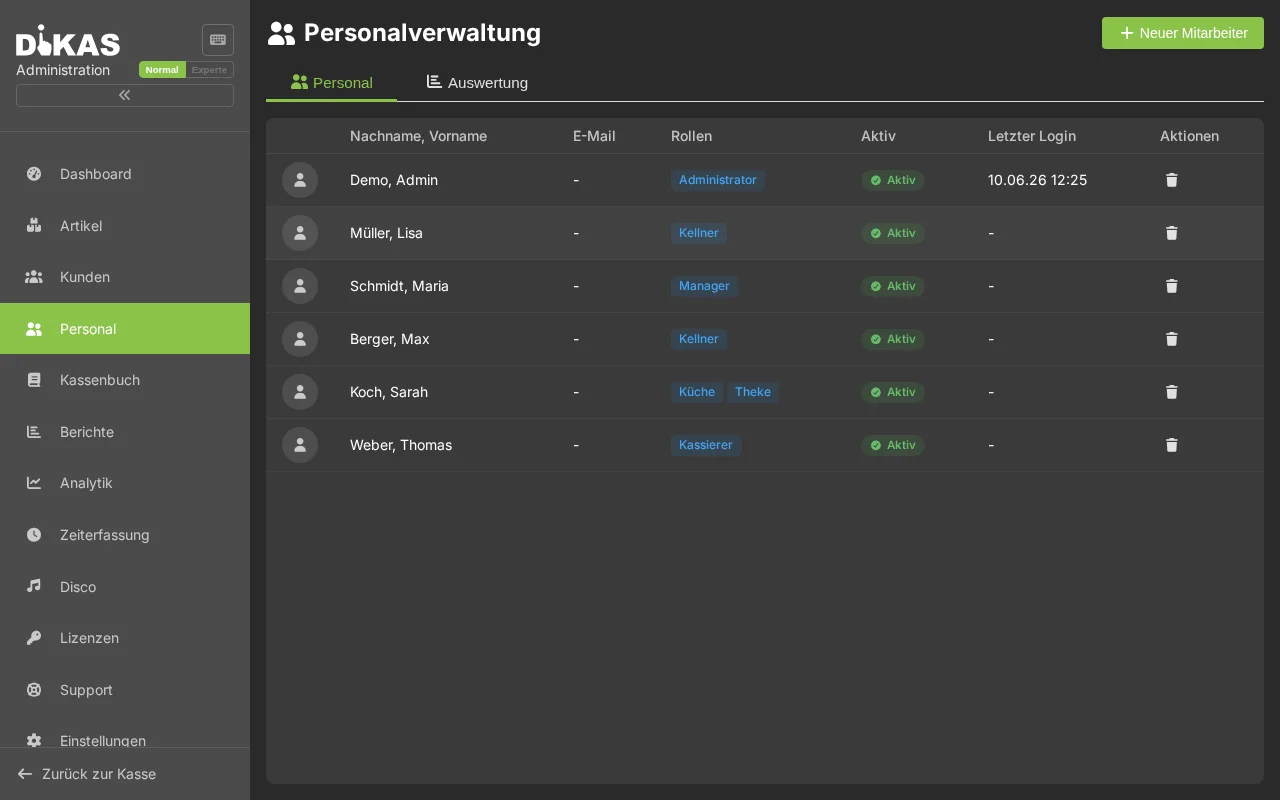
Adding Staff
Every employee who works with the POS needs their own user account. This allows you to track who booked what — and control who may use which functions.
Creating an Employee
Admin → Personal → "+ Mitarbeiter" (+ Employee)
Required Fields
| Field | Example | Description |
|---|---|---|
| Name | Maria Schmidt | First and last name |
| Short name | Maria | Displayed in the POS and on receipts |
| Username | maria | For login (must be unique) |
| Password | (choose securely) | For system login |
Optional Fields
| Field | Description |
|---|---|
| PIN (4-digit) | For quick staff switch |
| NFC card ID | For contactless login via card/chip |
| For notifications | |
| Employee number | Assigned automatically (starting from 1000) |
| Phone / Mobile | Contact details |
| Address | Street, postal code, city |
| Date of birth / Place of birth | Staff management |
| Start date / End date | Employment period |
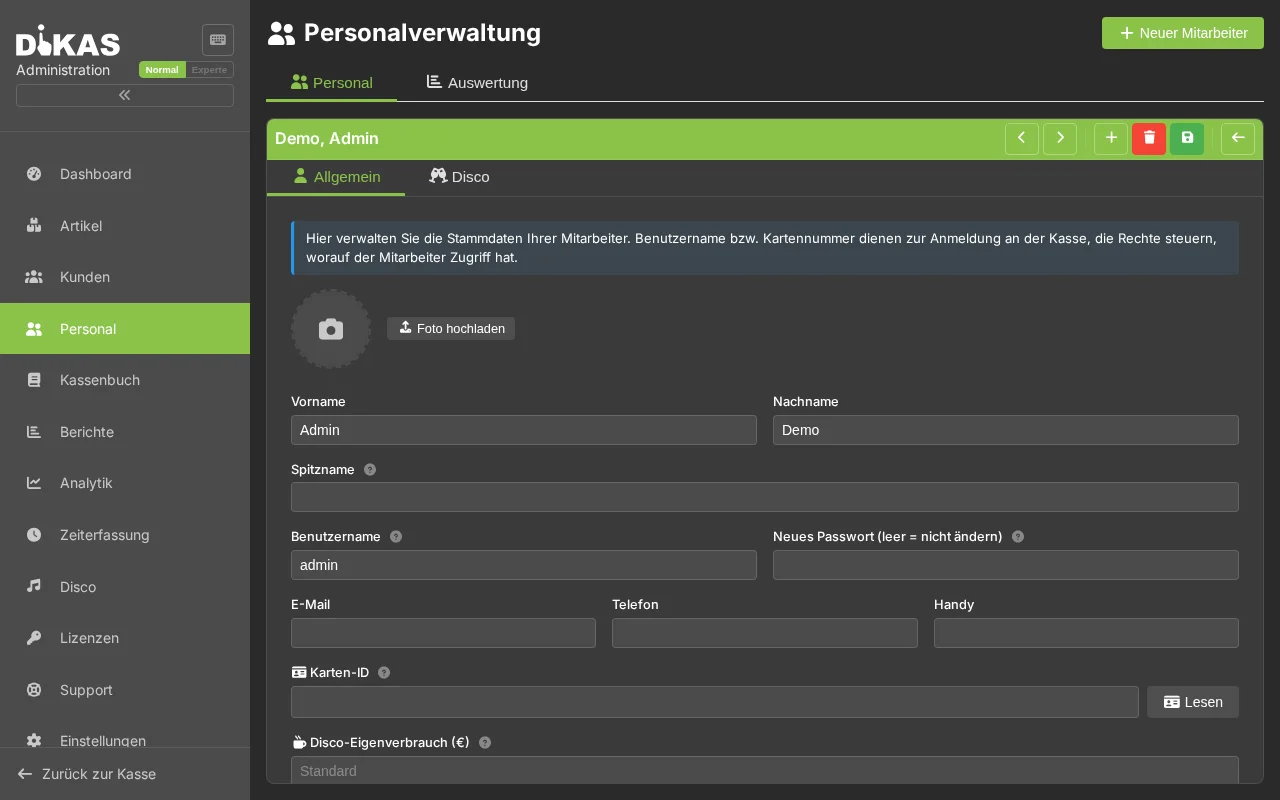
Employee Photo
- Open the employee → Tab "Allgemein" (General)
- Click the image field
- Upload a photo or capture one with the webcam
- It is automatically compressed as WebP (full image + thumbnail)
The photo appears in the selection list during staff switch.
Roles
DiKAS has 6 standard roles. When assigning a role, appropriate permissions are automatically set:
| Role | Description | Typical permissions |
|---|---|---|
| Admin | Full access to all functions | Everything allowed, void all transactions |
| Manager | Shift lead, extended rights | Void all transactions, close shift |
| Cashier | POS operations with void for own receipts | Void own transactions, close shift |
| Waiter | Orders and tables | Place orders, serve tables |
| Kitchen | Kitchen display, no POS functions | Kitchen view only |
| Bar | Bar area, no POS functions | Bar view only |
💡 Tip: An employee can have multiple roles simultaneously. Permissions are additive.
🔐 POS Rights (CashPointRights)
For fine-grained control, each employee has individual POS rights. These are configured in the "Rechte" (Rights) tab:

POS Permissions
| Right | Description |
|---|---|
| Login allowed | Disabled = employee cannot log in |
| Close shift | Close own shift (changeover) |
| End-of-day report | Create Z-report and close the day |
| Open cash drawer | Allow manual opening of the cash drawer |
Void Level
| Level | Description | For whom? |
|---|---|---|
| No void (0) | No voiding possible | Temporary staff, restricted employees |
| Own transactions (100) | Void only own receipts | Waiters, cashiers |
| All transactions (999) | Void all receipts | Managers, admins |
Voids are always TSE-signed and documented in the end-of-day report.
Table Permissions
| Right | Description |
|---|---|
| Own tables only | Can only see and serve assigned tables |
| Pay all tables | Can also check out tables of other servers |
| Transfer tables | May transfer orders to other tables |
Payments & Finances
| Right | Description |
|---|---|
| Payment allowed | Disabled = employee cannot process payments |
| Allow discount | Grant price reductions on items |
| Admin payment methods | Access to special payment methods (e.g., house tab) |
| View invoices | View customer invoices |
| Record expenses | Book cash withdrawals and expenses |
Visibility
| Right | Description |
|---|---|
| Hide revenue | Employee cannot see revenue figures |
| Inventory management | Access to stock functions |
Role Templates
When assigning a role, the POS rights are automatically pre-filled:
| Setting | Admin | Manager | Cashier | Waiter |
|---|---|---|---|---|
| Void level | 999 (all) | 999 (all) | 100 (own) | 0 (none) |
| Close shift | Yes | Yes | Yes | No |
| End-of-day report | Yes | No | No | No |
| Allow discount | Yes | Yes | No | No |
The templates are a starting point — you can adjust the rights individually afterwards.
📱 Setting Up NFC Login
For quick staff switch without PIN entry:
- Open the employee → Tab "Allgemein" (General)
- Field "Karten-ID" (Card ID) — tap the "NFC-Karte lesen" (Read NFC card) button
- Hold the NFC card or chip to the reader
- The card ID is automatically entered (or type it manually)
- Click "Speichern" (Save)
From now on, simply holding the card is enough — the employee is immediately logged in as the active server.
Supported readers: Built-in NFC on Android devices, any PC/SC card reader, Baltech NFC readers, and HID / keyboard-wedge readers. On the PC/web POS, PC/SC and Baltech readers are connected via the local hardware bridge DikasArch (enable it in the POS settings). → Details in Staff switch & login.
Card lost? Delete the card ID in Admin and assign a new card.
Shift Operations
Opening a Shift
When the first staff switch of the day occurs, a shift is automatically opened. Optionally with an opening balance:
- Perform a staff switch
- "Schicht öffnen" (Open shift) → Enter opening balance (e.g., 200.00 €)
The opening balance is the change money in the cash drawer and serves as the starting value for the cash count.
Closing a Shift
At the end of the shift:
- Menu → "Schicht schließen" (Close shift) (or via the staff switch)
- Count the cash drawer contents and enter the amount
- DiKAS shows the difference between expected and actual amounts
Schicht: Maria Schmidt, 05.03.2026, 11:00 – 22:30

Anfangsbestand:       200,00 €
+ Bar-Umsatz:         312,80 €
− Ausgaben:           −25,00 €
= Soll-Bestand:       487,80 €

Gezählt:              485,30 €
Differenz:             −2,50 €
Server Settlement
Each server can view their revenue: Menu → "Meine Abrechnung" (My settlement)
| Metric | Description |
|---|---|
| Total revenue | All payments this shift |
| of which cash | Cash payments |
| of which debit card | Card payments |
| of which house tab | On account |
| Receipts | Number of completed receipts |
| Voids | Count and amount |
The settlement shows only the employee's own revenue — other servers see their own figures.
Tips
Temporary staff: Create an employee with restricted rights (no voids, no expenses, own tables only). This allows temporary staff to work safely without causing issues.
Former employees: Set the employee to "Nicht aktiv" (Not active) instead of deleting them. This way, historical transactions remain assigned.
Multiple devices: An employee can be logged in on multiple devices simultaneously — e.g., POS and tablet. All transactions are correctly assigned.
Next Step
→ First Sale — Now let's process some sales!